A yeast starter is used to increase the biomass of a yeast and to ensure the yeast cells are healthy and ready to ferment. It is how you grow more yeast cells to ensure you have enough for a robust ferment and to ensure the yeast cells you are using are healthy and full of the nutrients needed to produce a good fermentation. Before I share my method, I thought it would be good to quickly cover some of the key reason you might need to use a yeast starter. While it wouldn’t cause problems, you don’t always need a yeast starter and its not the same as rehydrating dried yeast before use. It is used in specific situations and here are a few of the most common.
- Yeast Propagation
- Old Yeast
- Stuck Fermentation
Yeast Propagation
If you use wild yeast or some expensive liquid yeast, you might want to consider culturing that yeast for further propagation. You may hear cider makers espousing the benefits of natural or wild yeast on their process. It has some wonderful potential benefits. However, it also carries risks. You don’t really know what micro flora is present in your juice before you affix your airlock. You may want to use a natural micro flora but you may want to select that natural micro flora. Many breweries, wineries, and cideries have harvested and cultured the natural micro flora for their location. This allows them to have products that are unique while also having the benefits of a mixed culture. But, it helps eliminate the risk of unknown elements. As a home cider maker, you can do the same thing. You may also want to culture that expensive liquid yeast you purchased. Besides planning to harvest it for numerous batches, culturing it on a plate or slant before your first use is another way to extend its potential use.
These are two of the most common reasons might need to propagate yeast but they aren’t the only ones. If you are like me and got samples from the USDA or other local yeast culture bank, you will need to propagate them before you can use it. There are a number of reason or ways you might find yourself with a small amount of yeast and want to propagate or grow that in size so you can use it. Generally, these are harvested from slants or plates and are just a few colonies that need to be grown. This process requires a yeast starter. The amount of starter is initially small and is increased in size to increase the number of yeast cells but it is still a yeast starter. If you want details on the full process of propagating yeast, check out my yeast propagation article.

Old Yeast
Another very common situation that requires a yeast starter is when your yeast is old. This could be an unopened pack of dried or liquid yeast or it could be a bottle in your refrigerator from a batch you harvested months ago. If you make enough hard cider, you will probably find yourself in a situation where you have some yeast that is of questionable age but you still want to use it. In these situations, you will be well served to refresh this yeast by using a yeast starter. Also, instead of throwing out that expired package of yeast, try reviving it with a yeast starter.

Stuck Fermentation
The last common reason you would want to use a yeast starter is when your fermentation is stuck. There are various reason that you might have a stuck fermentation. A common one is when you accidentally added too much Campden (potassium metabisulfite) to your juice and it won’t ferment. Besides aerating it as I recommend in my article on why your cider isn’t fermenting, you should use a yeast starter to ensure the yeast are actively fermenting before adding it. Adding actively fermenting yeast to any stuck fermentation will at a minimum ensure those yeast cells continue fermenting and hopefully address whatever is causing the stuck condition. Even fermentations that are stuck because of nutrient deprivation may not start up if you just add nutrients. The yeast cells may be incapable of starting back up. Adding healthy and robust yeast that are active, will help ensure a continued result.
My Method
You now understand why a yeast starter might be needed, the real question is how to make one. Basically, you are providing your yeast a sterile medium that contains some sugar, good nutrients, and low to moderate acidity. High sugar is stressful to yeast, just like high acidity. I target 1.020 – 1.040 as a specific gravity level and a pH above 3.5. I am focused on making hard cider so I want my yeast starter medium to be similar to my product. I just try to keep it from being extreme. You can use other medium, like yeast malt extract commonly recommended for beer but I use apple juice. This is the method I use to propagate my USDA samples with good results. You can also download the PDF for offline reference.
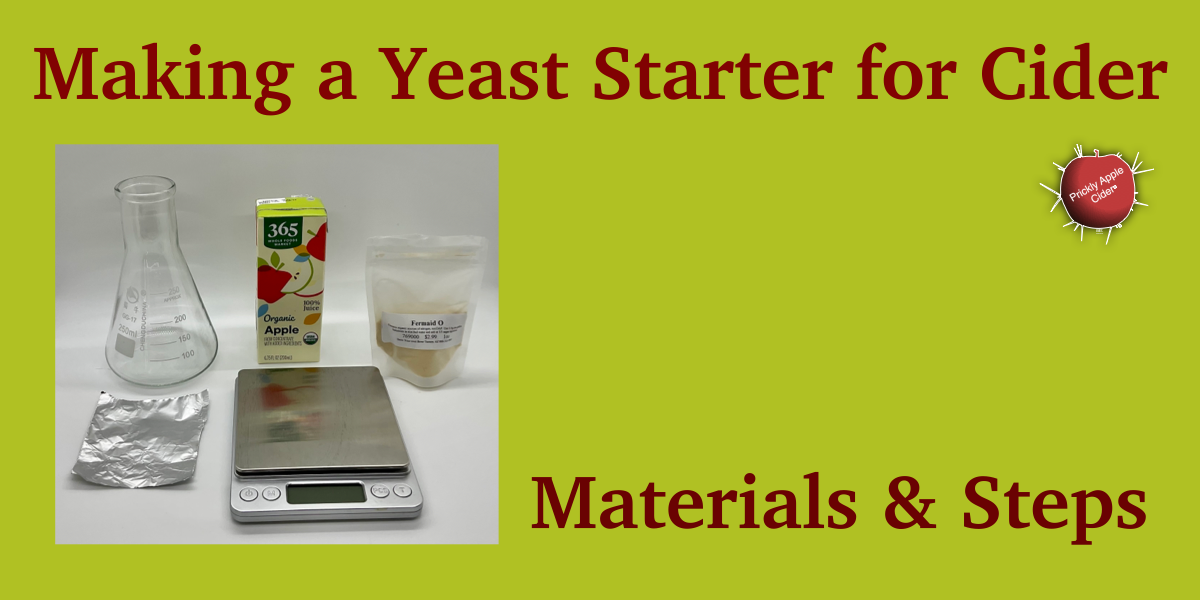
Materials List
- Sterile Flask, Measuring Cup or Container – You will usually want something that is twice the size of the liquid you need. Ideally, its sterile. My containers as usually just sanitized since I don’t have an autoclave or efficient way to sterilize.
- Sterile Water – You use filtered water and heat it in the microwave but you could use bottle or boiled water.
- Apple Juice – I use pasteurized 100% organic juice. You could use your fresh pressed juice but only if the starter you are making will go directly into the juice to begin fermenting. If you are propagating the yeast from a small sample, you want sterile juice or you will be propagating the micro flora in your juice.
- Aluminum Foil – It should be big enough to cover the opening of your container. I usually sanitize my foil versus sterilizing it.
- Yeast Nutrient – I use Fermaid O by Lallamand. It contains organic nitrogen versus inorganic like DAP.
- Scale or Small Measuring Spoon – It’s ideal if you can weigh your yeast nutrient but you can use a small measure spoon (1/8 teaspoon) to estimate it.
How much yeast starter you make will depend. If you are propagating from a slant, you probably want to start out with about 30-50ml. You will keep expanding this as you grow the yeast biomass until you reach a large enough yeast count to support pitching your yeast into your juice. With a slant, I usually start at 30ml and expand to around 250ml or 500ml depending on if you are pitching a 1 gallon (3.8 liter) or 3-5 gallon (11-19 liter) batch. Check out my article on yeast propagation for more details. The below starter assumes you need to revitalize some old yeast or address a stuck fermentation for a larger 3-5 gallon (11-20 liters) batch versus propagating.
Steps: Preparing a Yeast Starter for a 3-5 Gallon Batch
- Sterilize/Sanitize your equipment.
- Fill a flask or measuring cup with 200ml of juice and 100ml of water (I use a 2:1 ratio to dilute my juice by about 1/3, which reduces the sugar level and acidity).
- Add 0.25 grams of yeast nutrient (1/8 teaspoon is around 0.4 grams so about half).
- Mix well (sterile/sanitized spoon or swirling).
- Add old yeast or yeast to be used to restart the fermentation and cover with foil.
- Let is sit for at least 4 hours but ideally, 12-24 hours to allow the yeast to absorb the nutrients and start fermenting. You can let it complete fermentation and store it again if you want to have it ready in advance or your plans suddenly change. The yeast will have been revitalized and healthier. I recommend doing the starter the night before you plan to pitch it.
- A swirl plate is useful or a flask that you can periodically swirl to suspend the yeast. You can also sanitize that spoon again.
- Follow your normal process to pitch the yeast into juice or stuck cider.
Did you enjoy these tips on making hard cider? Check out my book to learn more ideas and information on making and enjoying hard cider. It will help you develop a process that matches your desire and equipment. It will also show you how to pair cider with food to maximize your experience. You can find it as an eBook and a 7×10 paperback on Amazon or a 7×10 paperback on Barnes & Noble. Click on these Links to check them out.