
As I’ve noted in an earlier article on pressing apples, there are a lot of methods and equipment you can purchase or make to press apples into juice. If you have quite a few full-sized trees in the backyard producing thousands of pounds (500+ kg) of fruit, a larger grinder and press system is probably the most economical. If you are more like me and press 20-200 pounds (9-91 kg) for any specific batch, you may want to choose a more economical method. I advocate for a juicer. There are two basic types, which are masticating and centrifugal. I’ll review the benefits of both type but, there are also some common tips for either type that I want to discuss. My main goal is that you realize that a juicer can be a great option for small to medium sized batches but recognize there are differences to the more traditional mill and press process. Let’s explore how you can effectively use a juicer to make hard cider.
- Common Juicer Tips
- Masticating Juicer
- Centrifugal
Common Juicer Tips
Regardless of what type of juicer you are using, there are three common tips you should consider when processing fruit into juice: motor rating, fruit size, and pulp.
Motor Rating: Most home juicers have a motor rated for 30 minutes of continuous operation. I don’t tend to run mine continuously for more than about 5-7 minutes because the juice fills the container and you need to shut it off to move the juice to the next stage. Even now where we have 3 juice pails and my wife runs the juicer while I wash apples and process the freshly pressed juice, we still shutdown the juicer for a 1-2 minutes after filling a couple of the pails to address some other process need. It is not hard if you really push to overheat your juicer after about 70-90 pounds (32-41 kg). That means you have to let it cool down to run it again. This can be where a process with some built-in down time can be helpful in keeping your juicer cool. I ultimately researched and found a juicer rated for 60 continuous minutes that was still reasonably priced. It’s also why I do my processing in an air conditioned or cool environment. There are some commercial juicers in the market that are made for smoothie shops. They will run 24/7 continuously. They also have a hefty price tag. Last time I looked, it was around US$1,500. I think a standard juicer will work fine for 1-3 gallons and it’s a great way to get started pressing your own apples and making that transition from store bought juice to fresh pressed.
Fruit Size: The second thing to note about a juicer is the opening size of the fruit chute (i.e. where you insert the fruit). Most older juicers have a very small chute where you insert the fruit. That means you have to often dice apples into smaller pieces. If you already have one of these, it can be used for small batches but processing more than a gallon can start to take the fun out of making your own cider. I recommend getting a wide-mouth juicer. Most are 2.75-3.25 inches (70-83mm), which is perfect for 80% of the apples you will find, especially smaller cider apple varieties. They even work for pears though sometimes you need to cut the neck. That means you usually can simply drop the whole fruit into the juicer for processing. You don’t need to cut, trim, remove stems or seeds.
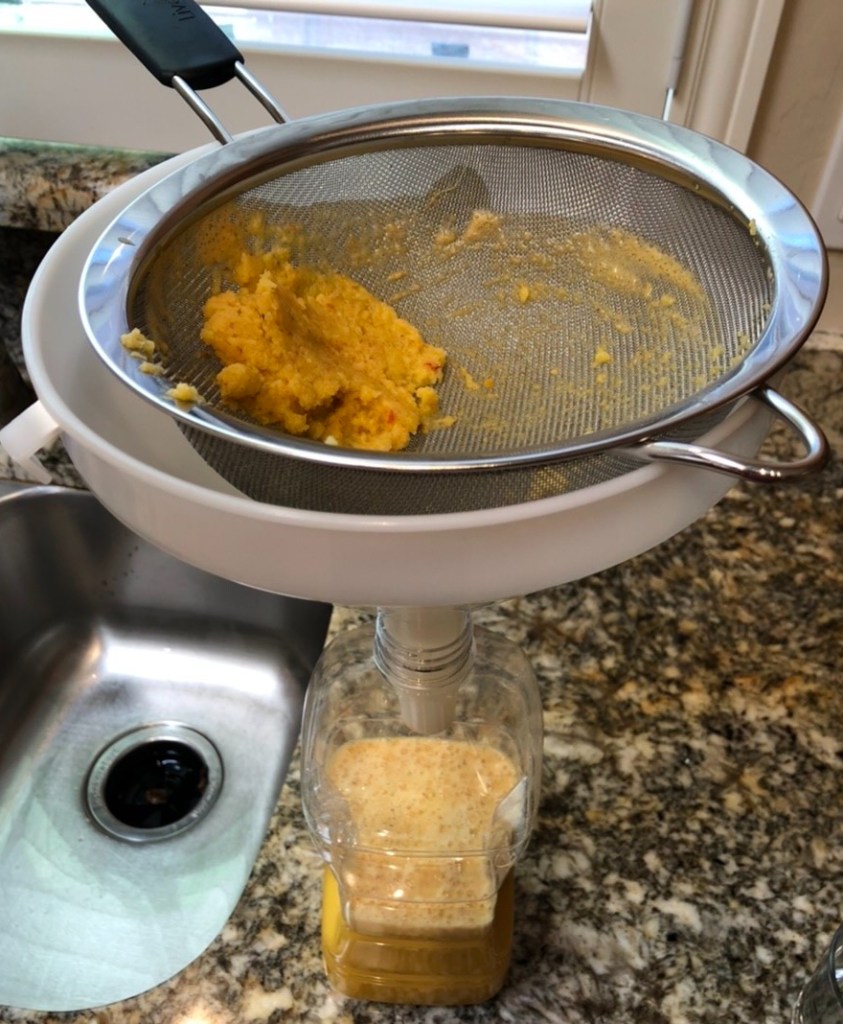
Pulp: All juicer create more pulp than a traditional mill and press setup. Just consider the traditional process. You are placing the ground apples into a cheese cloth or sack. This is basically a filter that helps trap the pulp and solids. This is why for a juicer, you want to run the juice through a stainless steel kitchen sieve or even better, a 75-100 micron nut/brew bag (see below photos). I place these in my funnel and pour the juice through them. With the bag, I can simply lift and hand squeeze the bag to extract more juice and leave behind the pulp and solids. You could leave these solids but it will usually mean you have a larger sediment layer (more loss when racking). Higher suspended solids will also create more phenolic aromas and increase the chance for off-flavors from spoilage organism like Brettanomyces. Plan to strain your juice if you are fermenting it. If you are drinking it fresh, those solids are good for you. You can also save the solids left in your sieve or nut bag and make fruit roll ups by spreading it on parchment paper and drying it in the oven.

Masticating Juicer
I have both types of juicers but for apples, I prefer the masticating type. Below is Kuving’s commercial model but most wide-mouth masticating juicers look very similar. There are smaller mouth juicers that look more like extruders. This was the first type I had but it required that I cut up all the apples prior to juicing. The wide mouth versions are usually top fed where the whole fruit interacts with an auger or screw that both breaks apart the apple and presses it. It combines both the grinding and pressing into one operation. As the auger turns it feeds parts of the apple downward. Around the auger is a mesh screen that allows juice to flow but stops much of the solids. Smaller solids with be retained in the juice, which is why you need to strain it. The juice is allowed to flow through a chute to the juice pail. As the apple is worked downward through the auger, it loses most of its liquid through the screen and into the juice pail. I get around 50-65% yield depending on the fruit but with high levels of pulp. Ultimately, the relatively dry pomace is pushed out the pomace chute.

The benefits of a masticating juicer are that the auger runs at a low revolution per minute (RPM). This keeps the process and the juice cooler and reduces the risk of oxidation. You will inject less oxygen in the juice and the lower temperatures will reduce the number of chemical reactions occurring. This type of juicer helps you retain polyphenols and tannins and prevent oxidative browning of the juice. Masticating juicers are most similar to a commercial belt press that feeds large quantities of fruit through rollers that crush the fruit and extract the juice. You need to monitor the pomace chute as stems, seeds, and other larger items that won’t break down in the auger process can become stuck in the chute. Most juicers come with a tool to help clear those but a dinner knife can make a handy tool for this as well. Like most juicers or even the traditional mill and press process, mushy fruit doesn’t work well. You tend to get very little juice and just have apple or pear sauce coming out both the juice and pomace chutes. Also, this type of juicer won’t work with very dry fruit or fruit with large amounts of hard seeds. For example, I broke a couple juicers trying to process manzanita berries and prickly pear cactus fruit. The ratio or pomace to juice in the manzanita berries was too low to effectively push the berry pomace through the auger. The prickly pear seeds are too hard and there are too many to fit through the auger system to reach the pomace chute. You are better using a blender to dice these and strain or heat to make a tea. The other option is a centrifugal juicer.
Centrifugal Juicer
Most centrifugal juicers are top fed and the feeding chute can be small or large. Again, I prefer the wide-mouth feed chute. The fruit is dropped or pushed into a high speed shredder. This shredder usually has blades on the bottom and a fine mesh screen on the sides. The shredder is often shaped like a partial cone. The blades at the bottom shred the fruit and cause it to be flung against the mesh. Centrifugal forces cause the liquid in the particles to be extracted through the mesh side walls. The taper design allows the parties to be move upwards along the mesh side walls until they reach the top and are flung out through a large chute into a collection pail. After passing through the mesh, the juice is drained through a small juice chute into the waiting pail or pitcher. Again, the juice will contain more solids and pulp given the forces involved in pushing it through the mesh side walls. The pomace is generally wetter as the extraction process is often not as efficient. I would estimate it is closer to 40-50% yield.

There are centrifugal juicers marketed as “cold pressed”. They are focused on the temperature increase of the juice noting that it is low, which helps prevent oxidation. Regardless of the advertising, a centrifugal juicer is going to increase the juice temperature more than a masticating juicer will. It will also add a lot of oxygen to your juice. This will definitely cause a large amount of tannins to be oxidized prior to fermentation. This may sound bad but, it may not be. Yeast need oxygen to reproduce and build mass to ensure a healthy fermentation process. You generally can’t add enough oxygen to your juice prior to fermentation. Using a centrifugal juicer would help with this. Also, if you are seeking to make a silver cider, pre-fermentation of oxidizable tannins is exactly what you want to do. This will help ensure those weaker tannins that are susceptible to oxidative browning will be removed during the fermentation process. This will leave you with a more stable and paler hard cider at the end of the process. If you want a fruitier hard cider focusing on yeasts that will ferment clean and create more aromatic fruity esters, this juicer might work well for you. If you want that deep amber cider with lots of tannins and phenolic notes, this juicer will make that harder. You might need to utilize some sulfites to prevent or reverse the oxidative browning and protect the tannins in your juice.
I really like to use my centrifugal juicer for fruit like prickly pear where they contain large seeds that won’t process through my masticating juicer. I tried manzanita berries and the low water to pomace ratio still didn’t work well. I was still better using the food processor to dice them and then heating them in water to extract the flavors. Ultimately, both types of juicer can be used to make great hard ciders and they offer an economical way to get started making your own juice for fermenting. They are an excellent way to transition from store bought juice to apples you picked at your local orchard or from your backyard trees. They are easy to clean and sanitize, I just soak mine in a Star San prior to use, and they will give you good yields for your effects. Just remember to run the juice through a kitchen sieve or nut bag to reduce the amount of pulp. Remember, if you are making your own juice, you are taking more control of your hard cider making process and that means you are also going to make better cider. Good luck and enjoy! Also, save some of that fresh juice in the refrigerator for the week to enjoy a glass with breakfast or dinner!
Did you enjoy this article? Don’t miss future posts from PricklyCider.com by following us today! PricklyCider.com is your source for all things cider.


you do not mention using steamer juicer. why not use it for hard cider making?
LikeLike
You can definitely use it. I know of people who do. Steam juicers are not very common in the US and I have not found much research on them. Therefore, I also don’t have a good understanding of how they may or may not impact your juice.
LikeLike